
Search Ads 360 (SA360) has the ability to automatically create campaigns using dynamic data, based on your inventory feed.
- Why are we so excited about this feature?
- Upgraded inventory campaigns can automatically create and remove keywords according to the products available within an inventory feed.
- Activity can be organised to fit in with your existing campaign structure and naming convention.
- Ads can be created dynamically using attributes within the feed, ensuring the messaging is always relevant and up-to-date.
Imagine completing the above for each product individually and keeping up with new products or regular changes to existing products. Upgraded inventory campaigns are a total game-changer!
And this isn’t just for retail. Upgraded inventory campaigns can work really well for other industries such as travel, recruitment and entertainment too.
Getting started
The first step is to familiarise yourself with the inventory feed you plan to use:
- Look at all attributes and make a note of those that could be used as part of the campaign creation, such as price, brand and title.
- Where possible, take this opportunity to tidy the feed or add missing information to the feed to make things as easy as possible when creating the inventory plan.
Once you’re happy with the feed and feel confident with the list of attributes you wish to use, you can start to build the plans and templates.
Organising your templates
Inventory plans should be created based on the desired output. For example, you may want to create one inventory plan that generates one campaign for each product category and another plan that generates one campaign for each brand.
Our tip: Start small and simple. Once you’re confident that you’ve achieved the desired output – expand.
The final solution will look something like this:
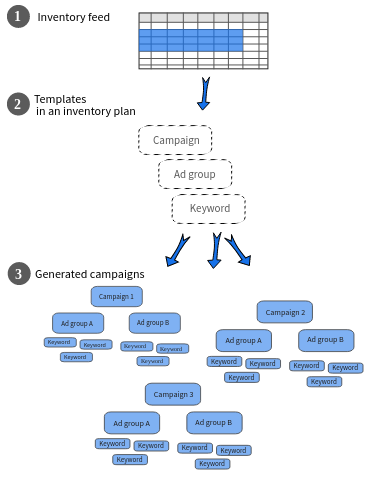
To create your first plan, navigate to…
SA360 > Select the Advertiser > Select ‘Templates’ within the left nav > Go to ‘Inventory Management’ > Click ‘+ New ’
Creating inventory templates
Once you have setup an inventory plan, templates can be created for each type of campaign, ad group, ad and keyword you’d like to generate. This is where you can leverage the power of functions, attributes and formula columns.
Using functions and inventory attributes
You might be really excited to start automatically creating super relevant ads for each ad group at scale, or you might just be keen to create a super tidy campaign structure. Either way, functions and feed attributes will quickly become your new best friend.
It is likely you’ll already have a list of feed attributes you wish to use from the initial planning. If not, we’d recommend adding the following as a minimum:
- Product title
- Price
- Landing page
The above will ensure your ad is super relevant. It’s likely the product title is what you’ve used to generate the keywords and the price will almost always play a part in the buying process.
As for functions – this is where you can unleash your creative side!
Not sure where to begin? A good starting point is to look at the following:
- trim(string) – to remove all whitespace from the beginning and end of string or remove any double spacing between words in string.
- clean_keyword(in-string, replacement-string) – to scan in-string and replace characters that Google Ads does not support for keyword text with replacement-string. Great for those pesky brackets often found within product titles!
- regex_replace(string, regular_expression, new_text) – to search a string for text that matches a regular_expression, then replace the matching text with new_text.
- bmm(string) to add the “+” character to the beginning of each word of string. Great to use in keyword templates to add the broad match modifier to each keyword term.
A full list of functions can be found here:
Our tip: Try a function then check the output to see if everything worked as you expected. Once you’re happy with one element, continue to build on your functions until you have a polished product.
When you’re confident that the campaigns, ad groups and keywords are pulling through as expected, you’re ready to activate the inventory plan and all relevant inventory templates.
That’s it! Now sit back, relax, and watch the inventory plan start working it’s magic. Within minutes, you’ll start seeing the newly created, super relevant campaigns appear within your account.
More information around upgraded inventory campaigns can be found here.
Any questions? Drop us a message!